Title: DIY Cookie Monster Rug
link : DIY Cookie Monster Rug
DIY Cookie Monster Rug
Bring everyone's favorite cookie eating monster home with your own cookie monster rug using blue faux-fur fabric and some other textile supplies. This soft rug is great for kids, and the cookie pillows really make it complete. Better hide your cookies, as this furry blue monster is ready to steal all your goodies (and then your heart). Ready? Let's make!

Step 1: To make your own monster rug you're going to need blue monster fur. You can usually find this at your local fabric shop, but you may need to hunt around a little. It's not that special, but smaller stores might not carry it. For this project I only needed one yard of blue fur (sold in a 6' width).
You're also going to need one package of white yarn and two black buttons for the eyes. An optional step would be to cover the underside with faux leather, which adds stability to the piece.

Step 2: I started by tracing my hand on a piece of blank paper. I then sketched around the trace until I had a hand shape that had shorter and wider fingers. Then, I cut out the hand shape with scissors.

Step 3: Start by folding the fur in half with the fur on the inside of the fold.

Using the paper hand cutout as a template I sketched an outline of the hand and the rest of the monster body. Since the fabric was folded in half I only needed to sketch out half the design. I went for a wider design, giving me lots of fun fur in my rug.


Step 4: When I was happy with an outline shape I used a sharp hobby knife to carefully cut through the top layer of fabric. Take time cutting around detailed areas like the fingers, this detail will show up on the rug.


Step 5: After cutting out one side of the design flip the fur over and fold in half, this time the fur will be on the outside of the fold. Now you can cut the other side of the monster rug out using the previously cut side as a guide.


Step 6: With both sides of the rug cut out you can unfold the fur and check out your shape. Now is the time to make corrections to any cuts made previously, or clean up any loose fabric bits.

Step 7: Part of this monster's charm is his goofy eyes. I wanted this rug to be as soft as possible for children, so I made these eyes from regular white yarn. Start by bunching up one end of the yarn, then wrapping the bunched yarn with tight winds, then start working the windings into a more spherical shape. After one eye was a little larger than a golf ball I stopped winding and started the other eyeball.
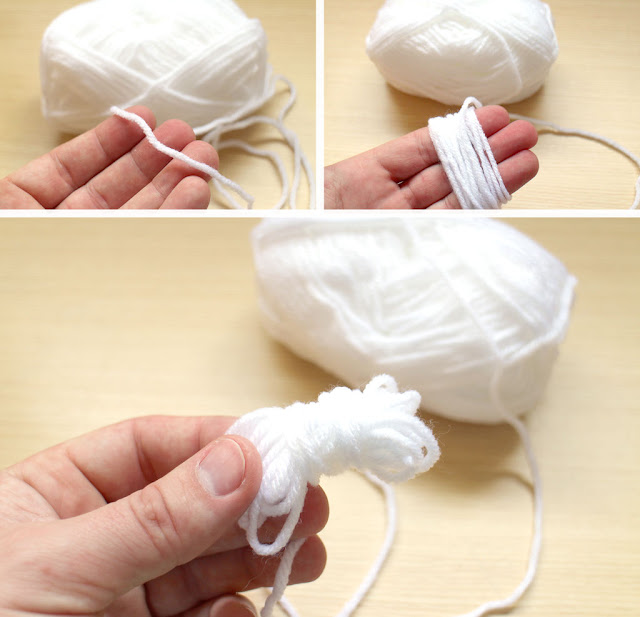
To prevent the yarn from unraveling after winding I tucked the end loosely under the previous winding and pulled tight. We'll stitch the yarn eyeballs next to secure the yarn and prevent any unraveling.

Step 8: A needle and white thread was used to sew a few stitches through the yarn eyes around the tucked end of the yarn, and around the entire eye to ensure the yarn windings stayed securely wound.


Step 9: I used black plastic glossy buttons for the pupils on the eyes. Using more white threat and a needle the buttons were sewn onto each yarn eyeball.

Step 10: The eyes are held in place with thick white embroidery thread. After each eye was attached to the head of the fur rug the eyes were stitched together to provide stability. This monster has crazy eyes, so remember to place the eyes a little crossed.


Step 11: Taking a page from real animal fur rugs, I decided to add some structure to my monster fur rug to enhance the look. Using dense flexible foam to make a head, I then cut a smaller disc shape and used spray adhesive to stick them together. This squashed dome shape would be the soft head structure for my monster rug.


I started by making a disc shaped cut out and beveling the edges.


I then cut a smaller disc shape and used spray adhesive to stick them together. This squashed dome shape would be the soft head structure for my monster rug.


The foam discs were then glued to the underside of the head using more spray adhesive.

Step 12 (optional): Your monster rug is almost done. If you want a more finished look you can line the underside with faux leather . Lay your monster rug on top of the faux leather and cut along the outline using a sharp hobby knife. I used more spray adhesive to connect the faux leather to the underside of the fur.

Step 13: Fluff out the fur around the edges, trim the fur with scissors if needed and cut back any excess leather.

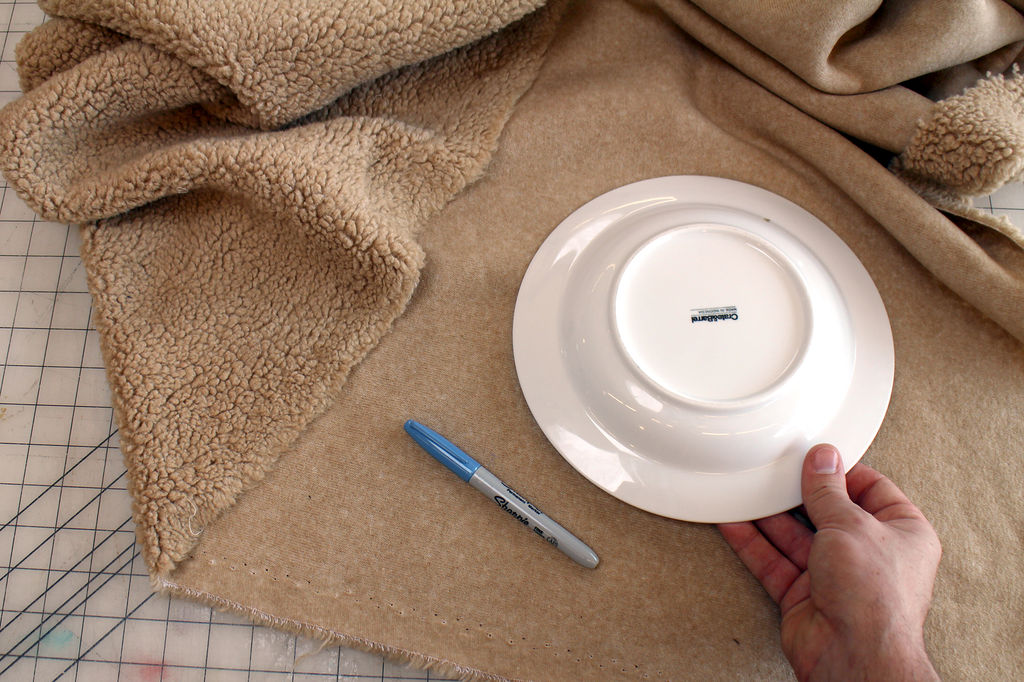
Step 14: What would this furry friend be without some large plush cookies to go along? I made large chocolate chip cookies from some soft beige fabric.

I used a large dinner plate to trace the outline on the underside of the fabric, then cut out two identical circles from the trace.

Step 15: With the underside facing out, the fabric circles were placed on top of each other and sewn together along the edge. Make sure to stop sewing when you're almost all the way around, but don't sew the cookie entirely closed yet, you'll need to have some room to turn it right side out.


Step 16: Using a darker plush fabric I cut irregular squarish shapes, and cut enough to speckle over the top of the cookie.

Step 17: To hold the chips in place I used fabric glue. I put a small dab on each chip and pressed it in place.


Step 18: Once the glue had dried I hand sewed each chip onto the cookie surface to ensure a secure connection.

Step 19: I used pillow batting to stuff the cookies through the opening I left when I was sewing the two halves together.


Step 20: Once stuffed, the cookies were sewn closed with beige thread.


Your fur rug and cookie pillows are now done! Time to place that rug and enjoy.
 via instructables

Step 1: To make your own monster rug you're going to need blue monster fur. You can usually find this at your local fabric shop, but you may need to hunt around a little. It's not that special, but smaller stores might not carry it. For this project I only needed one yard of blue fur (sold in a 6' width).
You're also going to need one package of white yarn and two black buttons for the eyes. An optional step would be to cover the underside with faux leather, which adds stability to the piece.
Step 2: I started by tracing my hand on a piece of blank paper. I then sketched around the trace until I had a hand shape that had shorter and wider fingers. Then, I cut out the hand shape with scissors.

Step 3: Start by folding the fur in half with the fur on the inside of the fold.

Using the paper hand cutout as a template I sketched an outline of the hand and the rest of the monster body. Since the fabric was folded in half I only needed to sketch out half the design. I went for a wider design, giving me lots of fun fur in my rug.


Step 4: When I was happy with an outline shape I used a sharp hobby knife to carefully cut through the top layer of fabric. Take time cutting around detailed areas like the fingers, this detail will show up on the rug.


Step 5: After cutting out one side of the design flip the fur over and fold in half, this time the fur will be on the outside of the fold. Now you can cut the other side of the monster rug out using the previously cut side as a guide.


Step 6: With both sides of the rug cut out you can unfold the fur and check out your shape. Now is the time to make corrections to any cuts made previously, or clean up any loose fabric bits.

Step 7: Part of this monster's charm is his goofy eyes. I wanted this rug to be as soft as possible for children, so I made these eyes from regular white yarn. Start by bunching up one end of the yarn, then wrapping the bunched yarn with tight winds, then start working the windings into a more spherical shape. After one eye was a little larger than a golf ball I stopped winding and started the other eyeball.

To prevent the yarn from unraveling after winding I tucked the end loosely under the previous winding and pulled tight. We'll stitch the yarn eyeballs next to secure the yarn and prevent any unraveling.
Step 8: A needle and white thread was used to sew a few stitches through the yarn eyes around the tucked end of the yarn, and around the entire eye to ensure the yarn windings stayed securely wound.


Step 9: I used black plastic glossy buttons for the pupils on the eyes. Using more white threat and a needle the buttons were sewn onto each yarn eyeball.

Step 10: The eyes are held in place with thick white embroidery thread. After each eye was attached to the head of the fur rug the eyes were stitched together to provide stability. This monster has crazy eyes, so remember to place the eyes a little crossed.


Step 11: Taking a page from real animal fur rugs, I decided to add some structure to my monster fur rug to enhance the look. Using dense flexible foam to make a head, I then cut a smaller disc shape and used spray adhesive to stick them together. This squashed dome shape would be the soft head structure for my monster rug.


I started by making a disc shaped cut out and beveling the edges.


I then cut a smaller disc shape and used spray adhesive to stick them together. This squashed dome shape would be the soft head structure for my monster rug.


The foam discs were then glued to the underside of the head using more spray adhesive.

Step 12 (optional): Your monster rug is almost done. If you want a more finished look you can line the underside with faux leather . Lay your monster rug on top of the faux leather and cut along the outline using a sharp hobby knife. I used more spray adhesive to connect the faux leather to the underside of the fur.
Step 13: Fluff out the fur around the edges, trim the fur with scissors if needed and cut back any excess leather.
Step 14: What would this furry friend be without some large plush cookies to go along? I made large chocolate chip cookies from some soft beige fabric.
I used a large dinner plate to trace the outline on the underside of the fabric, then cut out two identical circles from the trace.

Step 15: With the underside facing out, the fabric circles were placed on top of each other and sewn together along the edge. Make sure to stop sewing when you're almost all the way around, but don't sew the cookie entirely closed yet, you'll need to have some room to turn it right side out.


Step 16: Using a darker plush fabric I cut irregular squarish shapes, and cut enough to speckle over the top of the cookie.

Step 17: To hold the chips in place I used fabric glue. I put a small dab on each chip and pressed it in place.

Step 18: Once the glue had dried I hand sewed each chip onto the cookie surface to ensure a secure connection.

Step 19: I used pillow batting to stuff the cookies through the opening I left when I was sewing the two halves together.


Step 20: Once stuffed, the cookies were sewn closed with beige thread.


Your fur rug and cookie pillows are now done! Time to place that rug and enjoy.

Thus the article DIY Cookie Monster Rug
That's all the article DIY Cookie Monster Rug this time, hopefully can give benefits to all of you. okay, see you in another article post.
You are reading the article DIY Cookie Monster Rug on the website https://home-design-decor.blogspot.com/2016/12/diy-cookie-monster-rug.html
0 Response to "DIY Cookie Monster Rug"
Posting Komentar